What is Blazor Server in .NET Core 3.0 ?

What is Blazor Server in .NET Core 3.0?


What is Blazor Server?

To know more about the basics how Blazor contributes in C# programming language Building Client Web Application using Blazor in C#

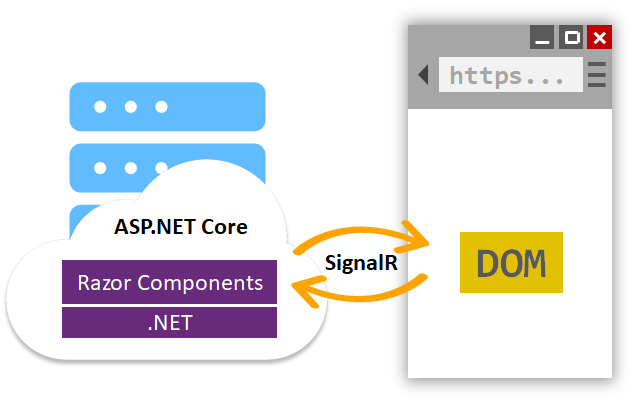
Blazor Server apps host Blazor components on the server and handle UI interactions over a real-time SignalR connection. As the user interacts with the app, the UI events are sent to the server over the connection to be handled by the various components that make up the app. When a component handles a UI event, it’s rendered based on its updated state. Blazor compares the newly rendered output with what was rendered previously and send the changes back to the browser and applies them to the DOM.

Blazor Server
Since Blazor Server apps run on .NET Core on the server, they enjoy all the benefits of running on .NET Core including great runtime performance and tooling. Blazor Server apps can leverage the full ecosystem of .NET Standard libraries without any browser imposed limitations.

When should I use Blazor Server?

Blazor Server enables you to add rich interactive UI to your .NET apps today without having to write JavaScript. If you need the interactivity of a single-page app in your .NET app, then Blazor Server is a great solution.
Blazor Server can be used to write completely new apps or to complement existing MVC and Razor Pages apps. There’s no need to rewrite existing app logic. Blazor is designed to work together with MVC and Razor Pages, not replace them. You can continue to use MVC and Razor Pages for your server-rendering needs while using Blazor for client-side UI interactions.
Blazor Server works best for scenarios where you have a reliable low-latency network connection, which is normally achieved when the client and server are geographically on the same continent. Apps that require extremely high fidelity instant updates on every tiny mouse twitch, like real-time games or drawing apps, are not a good fit for Blazor Server. Because Blazor Server apps require an active network connection, offline scenarios are not supported.
Blazor Server is also useful when you want to offload work from the client to the server. Blazor Server apps require only a small download to establish the connection with the server and to process UI interactions. All the hard work of running the app logic and rendering the UI is then done on the server. This means Blazor Server apps load fast even as the app functionality grows. Because the client side of a Blazor Server app is so thin, it’s a great solution for apps that need to run on low-powered devices

What is Blazor WebAssembly?

Blazor is a UI framework that can run in different environments. When you build UI components using Blazor, you get the flexibility to choose how and where they are hosted and run. As well as running your UI components on the server with Blazor Server, you can run those same components on the client with Blazor WebAssembly. This flexibility means you can adapt to your users’ needs and avoid the risk of being tied to a specific app hosting model.
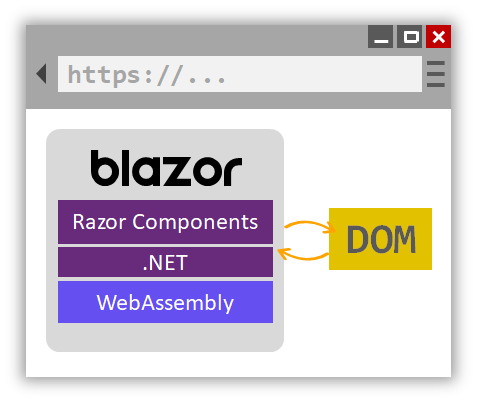
Blazor WebAssembly apps host components in the browser using a WebAssembly-based .NET runtime. The components handle UI events and execute their rendering logic directly in the browser. Blazor WebAssembly apps use only open web standards to run .NET code client-side, without the need for any browser plugins or code transpilation. Just like with Blazor Server apps, the Blazor framework handles comparing the newly rendered output with what was rendered previous and updates the DOM accordingly, but with Blazor WebAssembly the UI rendering is handled client-side.
Blazor WebAssembly

When should I use Blazor WebAssembly?

Blazor WebAssembly is still in preview and isn’t yet ready for production use yet. If you’re looking for a production ready solution, then Blazor Server is what we’d recommend.
Once Blazor WebAssembly ships (May 2020), it will enable running Razor components and .NET code in the browser on the user’s device. Blazor WebAssembly apps help offload work from the server to the client. A Blazor WebAssembly app can leverage the client device’s compute, memory, and storage resources, as well as other resources made available through standard browser APIs.
Blazor WebAssembly apps don’t require the use of .NET on the server and can be used to build static sites. A Blazor WebAssembly app is just a bunch of static files that can be hosted using any static site hosting solution, like GitHub pages or Azure Static Website Hosting. When combined with a service worker, a Blazor WebAssembly app can function completely offline.
When combined with .NET on the server, Blazor WebAssembly enables full stack web development. You can share code, leverage the .NET ecosystem, and reuse your existing .NET skills and infrastructure.
Including a .NET runtime with your web app does increase the app size, which will impact load time. While there are a variety of techniques to mitigate this (prerendering on the server, HTTP caching, IL linking, etc.), Blazor WebAssembly may not be the best choice for apps that are very sensitive to download size and load time.
Blazor WebAssembly apps also require a browser that supports WebAssembly. WebAssembly is supported by all modern browsers, including mobile and desktop browsers. However, if you need to support older browsers without WebAssembly support then Blazor WebAssembly isn’t for you.
Blazor WebAssembly is optimized for UI rendering scenarios, but isn’t currently great for running CPU intensive workloads. Blazor WebAssembly apps today use a .NET IL interpreter to execute your .NET code, which doesn’t have the same performance as a native .NET runtime with JIT compilation. We’re working to better address this scenario in the future by adding support for compiling your .NET code directly to WebAssembly instead of using an interpreter.
Summary
With .NET Core 3.0, you can build rich interactive client-side UI today with Blazor Server. Blazor Server is a great way to add client-side functionality to your existing and new web apps using your existing .NET skills and assets. Blazor Server is built to scale for all your web app needs. Blazor WebAssembly is still in preview, but is expected to ship in May of next year. In the future we expect to continue to evolve Blazor to support PWAs, hybrid apps, and native apps.
Read also ASP.NET Core

What is the difference between C# Class and Struct ?

What is the difference between C# Class and Struct?


Struct is Value Type
Struct is stored in Stack

Class is Reference Type
Class is stored in heap memory allocation

Like classes, structs are data structures that can contain data members and function members, but unlike classes, structs are value types and do not require heap allocation. 
A variable of a struct type directly stores the data of the struct, whereas a variable of a class type stores a reference to a dynamically allocated object.

Structs are particularly useful for small data structures that have value semantics. Complex numbers, points in a coordinate system, or key-value pairs in a dictionary are all good examples of structs.

For example, the following program creates and initializes an array of 100 points. With Point implemented as a class, 101 separate objects are instantiated—one for the array and one each for the 100 elements.

public class PointExample
{
    public static void Main() 
    {
        Point[] points = new Point[100];
        for (int i = 0; i < 100; i++)
            points[i] = new Point(i, i);
    }

}

An alternative is to make Point a struct

struct Point
{
    public int x, y;
    public Point(int x, int y) 
    {
        this.x = x;
        this.y = y;
    }
}

Struct constructors are invoked with the new operator, similar to a class constructor
 Point a = new Point(10, 10);
Point b = a;
a.x = 20;
Console.WriteLine(b.x);

If Point is a class, the output is 20 because a and b reference the same object. If Point is a struct, the output is
10 because the assignment of a to b creates a copy of the value, and this copy is unaffected by the subsequent
assignment to a.x

The Singapore students using Cloud for smarter recycling

The Singapore students using Cloud for smarter recycling

Coming up with big ideas in technology used to take the kind of time and money that only large companies had.  Now open source tools—like TensorFlow, which provides access to Google’s machine learning technology—mean anyone with a smart concept has the opportunity to make it a reality. Just ask Arjun Taneja and Vayun Mathur, two friends and high school students from Singapore with a big ambition to improve recycling rates.  
Arjun and Vayun realized that separating waste is sometimes confusing and cumbersome—something that can derail people’s good intentions to recycle. Using TensorFlow, they built a “Smart Bin” that can identify types of trash and sort them automatically. The Smart Bin uses a camera to take a picture of the object inserted in the tray, then analyzes the picture with a Convolutional Neural Network, a type of machine learning algorithm designed to recognize visual objects.  
To train the algorithm, Arjun and Vayun took around 500 pictures of trash like glass bottles, plastic bottles, metal cans and paper. It’s a process that would normally be laborious and expensive. But by using Google’s Colab platform for sharing resources and advice, the students could access a high powered graphics processor (GPU) in the cloud for free. They were also able to access Tensor Processing Units, Google’s machine learning processors which power services like Translate, Photos, Search, Assistant and Gmail. These tools helped their system analyze large amounts of data at once, so the students could correct the model if it didn’t recognize an object. As a result, the model learned to classify the objects even more quickly. Once the Smart Bin was trained, all they had to do was place an object in the tray, and the system could predict whether it was metal, plastic, glass or paper—with the answer popping up on a screen. 
Building on their successful trials at home, Arjun and Vayun showcased the Smart Bin with a stall at last week’s Singapore Maker Faire, and they continue to work on other projects. It’s a great example of how tools available in the cloud are cutting out processes and costs that might have held back this kind of invention in the past.
Demo :

Convolutional Neural Network (CNN)

This tutorial demonstrates training a simple Convolutional Neural Network (CNN) to classify CIFAR images. Because this tutorial uses the Keras Sequential API, creating and training our model will take just a few lines of code.

Import TensorFlow

from __future__ import absolute_import, division, print_function, unicode_literals
import tensorflow as tf
from tensorflow.keras import datasets, layers, modelsimport matplotlib.pyplot as plt

Download and prepare the CIFAR10 dataset

The CIFAR10 dataset contains 60,000 color images in 10 classes, with 6,000 images in each class. The dataset is divided into 50,000 training images and 10,000 testing images. The classes are mutually exclusive and there is no overlap between them.
(train_images, train_labels), (test_images, test_labels) = datasets.cifar10.load_data()
# Normalize pixel values to be between 0 and 1
train_images
, test_images = train_images / 255.0, test_images / 255.0
Downloading data from https://www.cs.toronto.edu/~kriz/cifar-10-python.tar.gz
170500096/170498071 [==============================] - 11s 0us/step

Verify the data

To verify that the dataset looks correct, let’s plot the first 25 images from the training set and display the class name below each image.
class_names = ['airplane', 'automobile', 'bird', 'cat', 'deer',
               
'dog', 'frog', 'horse', 'ship', 'truck']

plt
.figure(figsize=(10,10))
for i in range(25):
    plt
.subplot(5,5,i+1)
    plt
.xticks([])
    plt
.yticks([])
    plt
.grid(False)
    plt
.imshow(train_images[i], cmap=plt.cm.binary)
   
# The CIFAR labels happen to be arrays,
   
# which is why you need the extra index
    plt
.xlabel(class_names[train_labels[i][0]])
plt
.show()
png

How to return multiple values in C# ?

How to return multiple values in C#?


Methods can return a value to the caller. If the return type (the type listed before the method name) is not void, the method can return the value by using the return keyword. A statement with the return keyword followed by a variable, constant, or expression that matches the return type will return that value to the method caller. Methods with a non-void return type are required to use the return keyword to return a value. The return keyword also stops the execution of the method.
If the return type is void, a return statement without a value is still useful to stop the execution of the method. Without the return keyword, the method will stop executing when it reaches the end of the code block.
Sometimes, you want your method to return more than a single value. Starting with C# 7.0, you can do this easily by using tuple types and tuple literals. The tuple type defines the data types of the tuple’s elements. Tuple literals provide the actual values of the returned tuple. 
In the following example, (string, string, object, int) defines the tuple type that is returned by the GetPersonalInfo method. The expression (per.FirstName, per.MiddleName, per.Photo, per.Age) is the tuple literal; the method returns the first, middle, and last name, along with the personal image, of a PersonInfo object.
Lets get started !
Define the method with return types. Here you are passing personal data id value to retrieve the all the information and then return based on the data type mentioned 
public (string, string, object, int) GetPersonalInfo(string id) { PersonInfo per = PersonInfo.RetrieveInfoById(id); return (per.FirstName, per.MiddleName, per.Image, per.Age); }
The caller can then consume the returned tuple with code like the following:
var person = GetPersonalInfo(“853”); Console.WriteLine(“{person.Item1} {person.Item3}: age = {person.Item4}”);
Another way to define 
Names can also be assigned to the tuple elements in the tuple type definition
public (string FName, string MName, object pImage, int Age) GetPersonalInfo(string id) { PersonInfo per = PersonInfo.RetrieveInfoById(id); return (per.FirstName, per.MiddleName, per.Picture, per.Age); }
var person = GetPersonalInfo(“111111111”); Console.WriteLine(“{person.FName} {person.LName}: age = {person.Age}”);

What do you do when your friend won’t listen?

 What do you do when your friend won’t listen?


This happens almost to everyone, not only friend who doesn’t want to listen but also other relation. (wife) (mom) (sibling)
So how could we get our friend to listen to us? Human mind works the other way we think. so let’s get to the point
  1. Listen Never ask anyone to listen at the very first conversation never, instead you Listen to them. Let them realize how could you so passionate about paying attention. Try not to interrupt with any words only with nodding your head and saying okay, alright.. etc.
  2. Curiosity Human mind’s curiosity and excitement you can never make satisfied, I mean your 100% paying attention and silence will definitely trigger them with lot more questions inside them. Wait for it they will return to you asking answers.
  3. Exception In-spite of these above ways could not workout, you still remain calm and move on to your work, keep an eye on them and do not initiate the conversation, this will work for sure .
  4. Understanding Very Important one, your friend doesn’t want to listen to you does not mean he/she hates or irritates you, actually the right intention is to expecting you to understand their emotions and validate positively. They higher level of emotions are understood by someone (you) their fall back to you.
  5. Fun Part Wife gets angry or shouting it only means they are expecting husband to listen more.
  6. Solution You wanna be part of solution or problem for someone in life ? Listen and Pay Attention


iPhone 11 Pro Performance

iPhone 11 Pro Performance 

Earn Cash $1,000 by Referring to InstaReM

Earn Cash $1,000 by Referring to InstaReM 

Dear Friend, 
Your Referral Code : Ypo1Be

There’s nothing worse than missing out on an amazing offer. Don’t let it happen to you…
Grab up to USD 1,000 (or equivalent currency) on your next transfer with us.   
All you have to do is refer your friends to us and claim your reward.
https://www.instarem.com/en-my/

About .NET Core

About .NET Core

.NET Core has the following characteristics:
  • Cross-platform: Runs on Windows, macOS, and Linux operating systems.
  • Consistent across architectures: Runs your code with the same behavior on multiple architectures, including x64, x86, and ARM.
  • Command-line tools: Includes easy-to-use command-line tools that can be used for local development and in continuous-integration scenarios.
  • Flexible deployment: Can be included in your app or installed side-by-side (user-wide or system-wide installations). Can be used with Docker containers.
  • Compatible: .NET Core is compatible with .NET Framework, Xamarin, and Mono, via .NET Standard.
  • Open source: The .NET Core platform is open source, using MIT and Apache 2 licenses. .NET Core is a .NET Foundation project.
  • Supported by Microsoft: .NET Core is supported by Microsoft, per .NET Core Support.

Languages

C#, Visual Basic, and F# languages can be used to write applications and libraries for .NET Core. These languages can be used in your favorite text editor or Integrated Development Environment (IDE), including:
This integration is provided, in part, by the contributors of the OmniSharp and Ionide projects.

APIs

.NET Core exposes APIs for many scenarios, a few of which follow:
.NET Core provides compatibility with .NET Framework and Mono APIs by implementing the .NET Standard specification.

Frameworks

Multiple frameworks have been built on top of .NET Core:

Composition

.NET Core is composed of the following parts:
  • The .NET Core runtime, which provides a type system, assembly loading, a garbage collector, native interop, and other basic services. .NET Core framework libraries provide primitive data types, app composition types, and fundamental utilities.
  • The ASP.NET runtime, which provides a framework for building modern cloud-based internet connected applications, such as web apps, IoT apps, and mobile backends.
  • The .NET Core CLI tools and language compilers (Roslyn and F#) that enable the .NET Core developer experience.
  • The dotnet tool, which is used to launch .NET Core apps and CLI tools. It selects the runtime and hosts the runtime, provides an assembly loading policy, and launches apps and tools.
These components are distributed in the following ways:
  • .NET Core Runtime — includes the .NET Core runtime and framework libraries.
  • ASP.NET Core Runtime — includes ASP.NET Core and .NET Core runtime and framework libraries.
  • .NET Core SDK — includes the .NET CLI Tools, ASP.NET Core runtime, and .NET Core runtime and framework.

Open source

.NET Core is open source (MIT license) and was contributed to the .NET Foundation by Microsoft in 2014. It’s now one of the most active .NET Foundation projects. It can be used by individuals and companies, including for personal, academic, or commercial purposes. Multiple companies use .NET Core as part of apps, tools, new platforms, and hosting services. Some of these companies make significant contributions to .NET Core on GitHub and provide guidance on the product direction as part of the .NET Foundation Technical Steering Group.

Designed for adaptability

.NET Core has been built as a very similar but unique product compared to other .NET products. It was designed to enable broad adaptability to new platforms and workloads and it has several OS and CPU ports available (and it may be ported to many more).
The product is broken into several pieces, enabling the various parts to be adapted to new platforms at different times. The runtime and platform-specific foundational libraries must be ported as a unit. Platform-agnostic libraries should work as-is on all platforms, by construction. There’s a project bias towards reducing platform-specific implementations to increase developer efficiency, preferring platform-neutral C# code whenever an algorithm or API can be implemented in-full or in-part that way.
People commonly ask how .NET Core is implemented in order to support multiple operating systems. They typically ask if there are separate implementations or if conditional compilation is used. It’s both, with a strong bias towards conditional compilation.
You can see in the following chart that the vast majority of CoreFX is platform-neutral code that is shared across all platforms. Platform-neutral code can be implemented as a single portable assembly that is used on all platforms.
CoreFX: Lines of Code per Platform
Windows and Unix implementations are similar in size. Windows has a larger implementation since CoreFX implements some Windows-only features, such as Microsoft.Win32.Registry but doesn’t yet implement many Unix-only concepts. You’ll also see that the majority of the Linux and macOS implementations are shared across a Unix implementation, while the Linux and macOS-specific implementations are roughly similar in size.
There’s a mix of platform-specific and platform-neutral libraries in .NET Core. You can see the pattern in a few examples:

Comparisons to other .NET implementations

It’s probably easier to understand the size and shape of .NET Core by comparing it to existing .NET implementations.

Comparison with .NET Framework

.NET was first announced by Microsoft in 2000 and then evolved from there. The .NET Framework has been the primary .NET implementation produced by Microsoft during that nearly two decade period.
The major differences between .NET Core and the .NET Framework:
  • App-models — .NET Core doesn’t support all the .NET Framework app-models. In particular, it doesn’t support ASP.NET Web Forms and ASP.NET MVC, but it supports ASP.NET Core MVC. And starting with .NET Core 3.0, .NET Core also supports WPF and Windows Forms on Windows only.
  • APIs — .NET Core contains a large subset of .NET Framework Base Class Library, with a different factoring (assembly names are different; members exposed on types differ in key cases). In some cases, these differences require changes to port source to .NET Core. For more information, see The .NET Portability Analyzer. .NET Core implements the .NET Standard API specification.
  • Subsystems — .NET Core implements a subset of the subsystems in the .NET Framework, with the goal of a simpler implementation and programming model. For example, Code Access Security (CAS) isn’t supported, while reflection is supported.
  • Platforms — The .NET Framework supports Windows and Windows Server while .NET Core also supports macOS and Linux.
  • Open Source — .NET Core is open source, while a read-only subset of the .NET Framework is open source.
While .NET Core is unique and has significant differences to the .NET Framework and other .NET implementations, it’s straightforward to share code between these implementations, using either source or binary sharing techniques.
Because .NET Core supports side-by-side installation and its runtime is completely independent of the .NET Framework, it can be installed on machines with .NET Framework installed without any issues.

Comparison with Mono

Mono is the original cross-platform of .NET. It started out as an open-source) alternative to .NET Framework and transitioned to targeting mobile devices as iOS and Android devices became popular. It can be thought of as a community clone of the .NET Framework. The Mono project team relied on the open .NET standards (notably ECMA 335) published by Microsoft to provide a compatible implementation.
The major differences between .NET Core and Mono:
  • App-models — Mono supports a subset of the .NET Framework app-models (for example, Windows Forms) and some additional ones for mobile development (for example, Xamarin.iOS) through the Xamarin product. .NET Core doesn’t support Xamarin.
  • APIs — Mono supports a large subset of the .NET Framework APIs, using the same assembly names and factoring.
  • Platforms — Mono supports many platforms and CPUs.
  • Open Source — Mono and .NET Core both use the MIT license and are .NET Foundation projects.
  • Focus — The primary focus of Mono in recent years is mobile platforms, while .NET Core is focused on cloud and desktop workloads.

The future

It was announced that .NET 5 will be the next release of .NET Core and represents a unification of the platform. The project aims to improve .NET in a few key ways:
  • Produce a single .NET runtime and framework that can be used everywhere and that has uniform runtime behaviors and developer experiences.
  • Expand the capabilities of .NET by taking the best of .NET Core, .NET Framework, Xamarin and Mono.
  • Build that product out of a single code-base that developers (Microsoft and the community) can work on and expand together and that improves all scenarios.

Install Visual Studio Step by Step

Install Visual Studio Step by Step


We’ll walk you through it, step-by-step.

Step 1 – Make sure your computer is ready for Visual Studio

Before you begin installing Visual Studio:
  1. Check the system requirements. These requirements help you know whether your computer supports Visual Studio 2019.
  2. Apply the latest Windows updates. These updates ensure that your computer has both the latest security updates and the required system components for Visual Studio.
  3. Reboot. The reboot ensures that any pending installs or updates don’t hinder the Visual Studio install.
  4. Free up space. Remove unneeded files and applications from your %SystemDrive% by, for example, running the Disk Cleanup app.
For questions about running previous versions of Visual Studio side by side with Visual Studio 2019, see the Visual Studio 2019 Platform Targeting and Compatibility page.

Step 2 – Download Visual Studio

Next, download the Visual Studio bootstrapper file.
To do so, choose the following button, choose the edition of Visual Studio that you want, choose Save, and then choose Open folder.

Step 3 – Install the Visual Studio installer

Run the bootstrapper file to install the Visual Studio Installer. This new lightweight installer includes everything you need to both install and customize Visual Studio.
  1. From your Downloads folder, double-click the bootstrapper that matches or is similar to one of the following files:
    • vs_community.exe for Visual Studio Community
    • vs_professional.exe for Visual Studio Professional
    • vs_enterprise.exe for Visual Studio Enterprise
    If you receive a User Account Control notice, choose Yes.
  2. We’ll ask you to acknowledge the Microsoft License Terms and the Microsoft Privacy Statement. Choose Continue.
    License Terms and Privacy Statement

Step 4 – Choose workloads

After the installer is installed, you can use it to customize your installation by selecting the feature sets—or workloads—that you want. Here’s how.
  1. After the new workloads and components are installed, choose Launch.
    Visual Studio 2019: Install a workload
    For example, choose the “ASP.NET and web development” workload. It comes with the default core editor, which includes basic code editing support for over 20 languages, the ability to open and edit code from any folder without requiring a project, and integrated source code control.
  2. After you choose the workload(s) you want, choose Install.
    Next, status screens appear that show the progress of your Visual Studio installation.
 Tip
At any time after installation, you can install workloads or components that you didn’t install initially. If you have Visual Studio open, go to Tools > Get Tools and Features… which opens the Visual Studio Installer. Or, open Visual Studio Installer from the Start menu. From there, you can choose the workloads or components that you wish to install. Then, choose Modify.

Step 5 – Choose individual components (Optional)

If you don’t want to use the Workloads feature to customize your Visual Studio installation, or you want to add more components than a workload installs, you can do so by installing or adding individual components from the Individual components tab. Choose what you want, and then follow the prompts.
Visual Studio 2019 - Install individual components

Step 6 – Install language packs (Optional)

By default, the installer program tries to match the language of the operating system when it runs for the first time. To install Visual Studio in a language of your choosing, choose the Language packs tab from the Visual Studio Installer, and then follow the prompts.
Visual Studio 2019 - Install language packs

Change the installer language from the command line

Another way that you can change the default language is by running the installer from the command line. For example, you can force the installer to run in English by using the following command: vs_installer.exe --locale en-US. The installer will remember this setting when it is run the next time. The installer supports the following language tokens: zh-cn, zh-tw, cs-cz, en-us, es-es, fr-fr, de-de, it-it, ja-jp, ko-kr, pl-pl, pt-br, ru-ru, and tr-tr.

Step 7 – Select the installation location (Optional)

You can reduce the installation footprint of Visual Studio on your system drive. You can choose to move the download cache, shared components, SDKs, and tools to different drives, and keep Visual Studio on the drive that runs it the fastest.
Visual Studio 2019 - Select installation locations
 Important
You can select a different drive only when you first install Visual Studio. If you’ve already installed it and want to change drives, you must uninstall Visual Studio and then reinstall it.
For more information, see the Select installation locations page.

Step 8 – Start developing

  1. After Visual Studio installation is complete, choose the Launch button to get started developing with Visual Studio.
  2. On the start window, choose Create a new project.
  3. In the search box, enter the type of app you want to create to see a list of available templates. The list of templates depends on the workload(s) that you chose during installation. To see different templates, choose different workloads.
    You can also filter your search for a specific programming language by using the Language drop-down list. You can filter by using the Platform list and the Project type list, too.
  4. Visual Studio opens your new project, and you’re ready to code!

Microsoft News on Android and iOS

Microsoft News on Android and iOS


Modern and Beautiful
Completely redesigned into a modern experience tailored to IOS and Android.
playing Experience the best of what Microsoft News has to offer

Pick and Choose

You can now pick the layout you like best on your phone – standard, compact or text-only.

Dark Theme

Enable better nighttime reading with the new Dark Theme mode.

Deeply personalized

Ability to tailor interests to follow in your news feed – such as World News, Personal Finance, Fitness and many more.

Be in sync

Signing in will keep your interests and app settings everywhere you use Microsoft News

SIGN-UP FOR MICROSOFT ACCOUNT 

Design a site like this with WordPress.com
Get started